Get running
SDK quickstart: a running 3D configurator in fifteen minutes
Get a catalog in and publish it, create a key, install the package, add a token route, call mount() once. Nine steps, on a page of their own.
Install @imagineio/configurator-sdk, add a small server route that exchanges your API key for a session token, and call mount() once with the system id. From an empty Vite app to a live configurator with live pricing in about fifteen minutes. Rules, constraints and pricing run on the server; the browser only renders.
Nine steps
Create a Vite React app
Skip this if you are adding the SDK to an existing Vite app. Vite is the supported path: the SDK ships ES modules and a Vite plugin that serves its static files and keeps react and three deduped.
npm create vite@latest my-configurator -- --template react cd my-configuratorInstall the SDK
Version 0.1.6 and later support React 18 and React 19. The 3D packages (three, fiber, drei) are installed for you, at the versions that match your React.
React 19, which a fresh Vite template ships: install the package on its own. npm adds three.js 0.186, @react-three/fiber 9 and @react-three/drei 10. Keep React at 19.3 or earlier; @react-three/fiber 9 does not accept 19.4 yet.
npm install @imagineio/configurator-sdkReact 18: name the React 18 versions in the same command, so npm installs three.js 0.159, @react-three/fiber 8 and @react-three/drei 9. A fresh Vite template ships React 19 types, so install the React 18 ones too.
npm install @imagineio/configurator-sdk react@^18.2 react-dom@^18.2 three@~0.159.0 @react-three/fiber@^8.15 @react-three/drei@^9.88 @react-three/postprocessing@^2.16 postprocessing@~6.36.0 npm install -D @types/react@^18.2 @types/react-dom@^18.2One visible difference: three.js 0.186 lights the same HDR environment slightly differently from 0.159, so a scene can look a little different on React 19 than on React 18. That comes from three.js; no setting changes it.
Add the Vite plugin
One plugin, two jobs. It serves the SDK's static files in development and copies them into your build: mainly the Draco decoder, which the browser needs to unpack the compressed 3D models, so without it models fail silently. And it keeps react and three deduped, so a second copy pulled in by another dependency cannot blank the canvas.
// vite.config.js import imagineConfigurator from '@imagineio/configurator-sdk/vite'; export default defineConfig({ plugins: [react(), imagineConfigurator()], });Get a catalog in: import a sample or upload your own
The configurator shows nothing until the organisation has a catalog. Sign in to the imagine.io dashboard, or sign up first if your organisation has no account yet, then get a catalog in, either way:
- Import a sample catalog. A sectional sofa or a kitchen, with models, textures, rules and prices, ready in a few minutes: download, extract, drop the folder on Catalog › Import Catalog. The sample catalogs page has the links and the five steps. The fastest way to see the SDK running.
- Upload your own. Products and variants, materials, components, option sets and options, then a configurable system that ties them together. The admin guide walks through each in order, or the same importer takes your own spreadsheet and assets.
Sign in, or create the account, at the dashboard. Publish the layout
Both routes end in a draft. Open the system under Scenes › Configurable Systems, then Layouts › Publish. Until you do, the configurator mounts into an empty scene with no error, because nothing failed.
While the system is open, note its system id: the number at the end of the address bar, also listed next to each system. The mount step needs it.
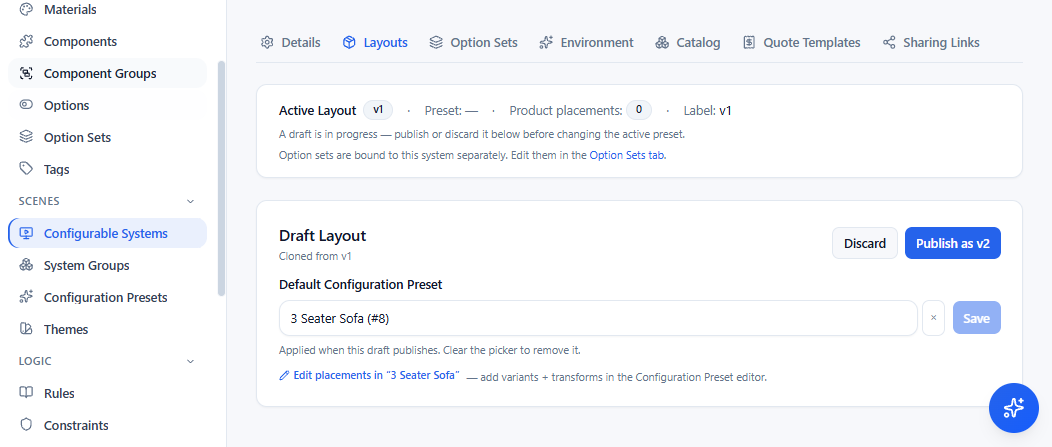
Layouts › Publish. The system id is the number at the end of the address bar. Get your API key
Go to Settings › API Keys and press Create key. Name it after the site that will use it, choose Read & write or Read only, and list the websites that may use it:
shop.example.comfor a site,*.example.comfor its subdomains, and for your machinelocalhostwith its port,localhost:5173. A key with an empty list works nowhere. One key serves every system in the organisation.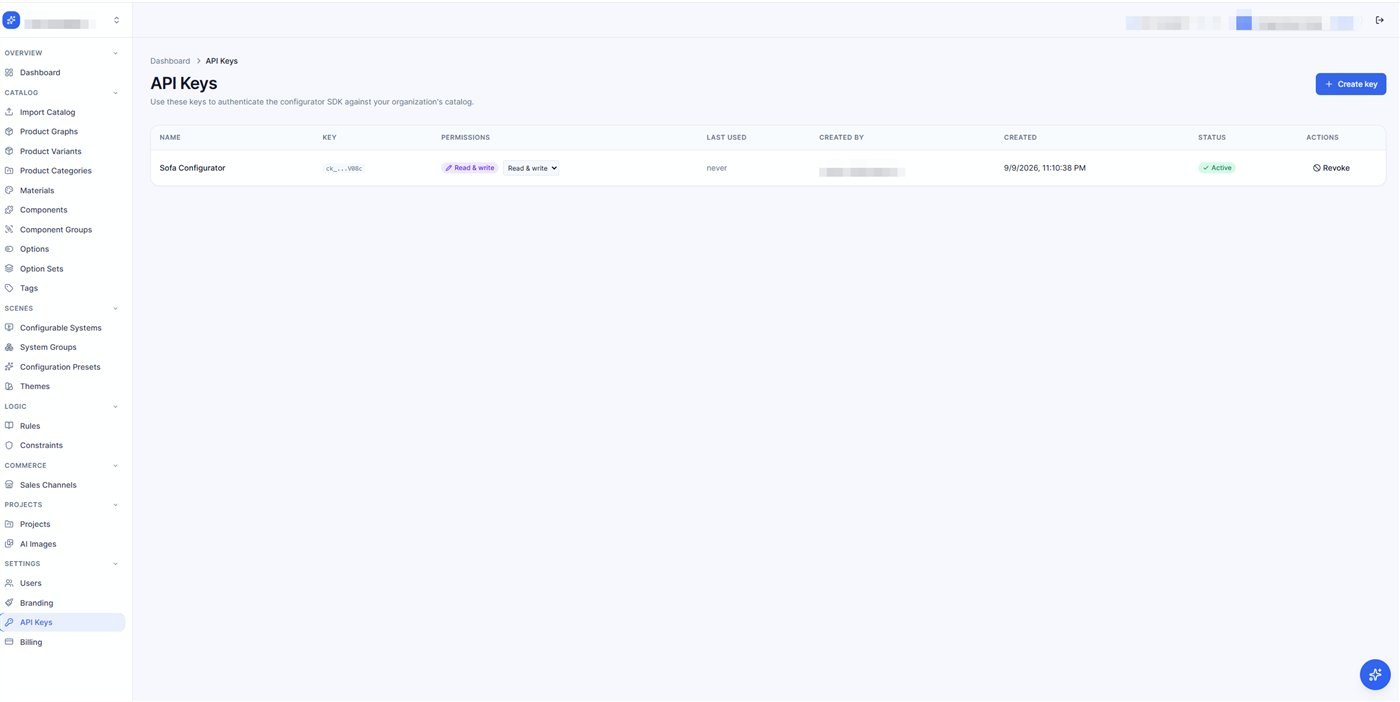
Settings › API Keys. Copy the key when it is shown; its permission and websites can be changed later. Add the key and mount
Put the key in an env file, not in your source. Create
.env.localnext topackage.json; Vite loads it and git ignores it.VITE_API_KEY=YOUR_ORG_API_KEYThe SDK reads
VITE_API_KEYon its own. Replacesrc/main.jsxwith this; the SDK brings its own styles.import { mount, config } from '@imagineio/configurator-sdk'; // Optional: a sales channel, for per-channel prices, hidden options and a theme config.setChannelId('dealer-42'); // Boot the system, load catalog and scene, render the full default UI const app = mount('#root', { systemId: 1 }); // later: app.unmount();Production: a session token instead of the key
The API key is long-lived and reads your whole catalog, so it must never reach a browser. In production your server asks imagine.io for a session token, which lasts 30 minutes and is safe for the browser to hold, and the SDK uses that instead. One route on your server:
// server.js app.post('/configurator-token', async (req, res) => { const r = await fetch('https://api-configurator.imagine.io/api/v1/auth/token/', { method: 'POST', headers: { 'X-Api-Key': process.env.CONFIGURATOR_API_KEY, 'Content-Type': 'application/json' }, body: JSON.stringify({ scope: 'session', system_id: 12, origin: 'https://www.your-site.com' }), }); res.status(r.status).json(await r.json()); });The three body fields are optional and each narrows what the token can do:
scopeissession(can save projects and upload renders) orcatalog(load, configure and price only);system_idlocks it to one system;originlocks it to your site. Then handmount()the route. NoVITE_API_KEYexists in this build.const app = mount('#root', { systemId: 12, getToken: async () => (await fetch('/configurator-token', { method: 'POST' })).json(), });The SDK sends the token as
Authorization: Beareron every request, calls your route again shortly before the token expires and once more on a401. If the key ever leaks, revoke it in the dashboard: every token made from it stops working within about 30 seconds. More in how session tokens work.Run
npm run devWhat you should see: a brief loader, then the customisation options on the left and the 3D scene on the right. A different
systemIdis a different configurator, a sofa, a kitchen, a wardrobe, with no frontend change. An empty scene with no error means the layout was never published: step 5. Blank page or missing models? The troubleshooting section covers every known cause.
What next
You have a running configurator. The three things most teams do next each have a walkthrough in the SDK docs:
Frequently asked questions
Do I have to use Vite?
For the quickstart, yes: it is the documented and tested path, and the SDK's Vite plugin does two things for you, serving the static files (mainly the Draco decoder) and keeping react and three deduped. The package itself is compiled ES modules, so another bundler can load it if you do those two things by hand; the React guide's FAQ lists them.
Why does npm install fail with ERESOLVE?
Two causes. A React 18 app that installed the package on its own: npm picked the React 19 versions, so name the React 18 ones in the same command: npm install @imagineio/configurator-sdk react@^18.2 react-dom@^18.2 three@~0.159.0 @react-three/fiber@^8.15 @react-three/drei@^9.88 @react-three/postprocessing@^2.16 postprocessing@~6.36.0. A React 19 app that already has three.js 0.187 or newer, which the SDK does not accept yet: run npm install @imagineio/configurator-sdk three@~0.186.0. Do not use --legacy-peer-deps; it only hides the conflict.
Which React versions does the SDK support?
React 18 and React 19, in version 0.1.6 and later. One package covers both; your React version decides which 3D packages npm adds: three.js 0.186, @react-three/fiber 9 and @react-three/drei 10 on React 19; three.js 0.159, @react-three/fiber 8 and @react-three/drei 9 on React 18. On React 19, keep React at 19.3 or earlier; @react-three/fiber 9 does not accept 19.4 yet.
How do I move an app from React 18 to React 19?
Remove the React 18 3D packages and reinstall from scratch; installing React 19 over them stops with ERESOLVE, because package-lock.json still holds @react-three/fiber 8. Run npm uninstall three @react-three/fiber @react-three/drei @react-three/postprocessing postprocessing, delete node_modules and package-lock.json, then run npm install react@^19.3.1 react-dom@^19.3.1 and npm install -D @types/react@^19.3.0 @types/react-dom@^19.3.0. npm then adds the React 19 versions for the SDK.
Can I ship VITE_API_KEY to production?
No. The API key is long-lived and reads the whole catalog. In production a route on your server exchanges it for a 30-minute session token, and mount() gets that route as getToken. The browser only ever holds the token.
Where does the system id come from?
Scenes › Configurable Systems in the dashboard. Each configurator built for your organisation is listed with its id; it is also the number at the end of the address bar when a system is open.
Why is the scene empty after I mount?
Almost always because the layout was not published. A catalog, imported or built by hand, stops at a draft; open the system under Scenes › Configurable Systems and press Publish on the Layouts tab. The other cause is a systemId that names a different system.